3.2 Basic Administrative Operations
MySQL
Having a firm grasp of the theoretical concepts in the preceding section, let us move onto a practical implementation of this knowledge.

For this module, we will be using a free and open database engine to learn with, called MySQL. This database engine can be downloaded and installed free of charge from mysql.com . Once installed, you should be able to access the database through the mysql command-line client utility. When we describe commands to enter into the MySQL command-line utility, we will prefix the commands with the following:
mysql> **some command will go here**
Creating Databases and Tables
Create a Database
Before we can start working on tables and rows of data, we need to create and open a database. Do do this, we first decide on a name, and we execute the following statement:
mysql> CREATE DATABASE `db_name`;
Notice that there is a semi-colon (;) at the end of that statement. In MySQL (as well as many C-based languages), individual statements are separated by a semi-colon. This enables multiple statements to occur on the same line, and be executed sequentially.
Once we have created the database, we can now start to perform operations on it such as creating tables and running queries. However, before we start writing these SQL statements, we need to tell the MySQL server that the following SQL statements are to be performed on a particular database. We do this using the USE command, as follows:
mysql> USE `db_name`;
We are now ready to start adding tables, and running queries.
Create a Table
A blank database is not of much use to us, so let's start adding tables. It is a good idea to have first fully investigated the requirements for the application which will use the database you are about to create and to plan the database structure using an Entity Relationship Diagram (ERD) as seen above. Once you know the table structures you wish to create, we can create them as follows:
mysql> CREATE TABLE `table_name` (
  `uid` int(11) auto_increment,
  `creation_date`  datetime NOT NULL default '0000-00-00 00:00:00',
  `created_by` int(11) NOT NULL default 0,
  `some_string` varchar(255) NOT NULL default '',
  `some_decimal` decimal(10, 2) NOT NULL default 0,
  PRIMARY KEY (`uid`),
  FOREIGN KEY (`created_by`) REFERENCES users(uid)
);
There are a few things to note. Firstly, notice that for each field, the format is basically:
- The field name, enclosed in back-ticks
- The data type
- A statement to ensure it is never NULL
- The default value of the field
Secondly, notice that all the field definitions are enclosed by parentheses (). Lastly, note that the last segment of the field listings is the PRIMARY KEY and FOREIGN KEY definitions, in which we specify we are using the uid field as the PRIMARY KEY, and in this example, that the created_by field is a FOREIGN KEY pointing to the users table's PRIMARY KEY, uid.
Note: You cannot have an auto_incrementing value which is not also the primary key, MySQL will not allow this.
Another useful way of creating a table is by replacing the field listing with a select query. This is useful if you wish to create a table, with either the same structure, or a subset thereof, as well as the same data, or a subset thereof, of another table. For example, if you have a table of customers, and you wish to move some of the customer data out of the customers table and into an archived area, we can do this as follows:
mysql> CREATE TABLE `archived_customers` SELECT * FROM `customers` WHERE `datetime` < '2000-01-01';
mysql> DELETE FROM `customers` WHERE `datetime` < '2000-01-01';
The above query achieves 'moving' the customer data older than 1 January 2000 into an archive table by first creating a table archived_customers with the same table structure as the customers table, and automatically populating this new archived_customers table with the data we wish to archive. The second statement is a DELETE statement which removes the archived data from the originating customers table. We will look at the SELECT and DELETE queries later on.
Investigating Tables
Once we have created some tables, we can list the tables which exist in the currently active database by using the following command:
mysql> SHOW TABLES;
+---------------------------+
| Tables_in_mysql           |
+---------------------------+
| columns_priv              |
| db                        |
| event                     |
| func                      |
| general_log               |
| help_category             |
| help_keyword              |
| help_relation             |
| help_topic                |
| host                      |
| ndb_binlog_index          |
| plugin                    |
| proc                      |
| procs_priv                |
| servers                   |
| slow_log                  |
| tables_priv               |
| time_zone                 |
| time_zone_leap_second     |
| time_zone_name            |
| time_zone_transition      |
| time_zone_transition_type |
| user                      |
+---------------------------+
We can also get the CREATE TABLE code used to create a table, using the following syntax:
mysql> SHOW CREATE TABLE `user`
A very useful command is the DESCRIBE function, which returns a table of information about the fields within a table.
mysql> DESCRIBE `table_name`;
For example:
mysql> DESCRIBE `user`;

+-----------------------+-----------------------------------+------+-----+---------+-------+
| Field                 | Type                              | Null | Key | Default | Extra |
+-----------------------+-----------------------------------+------+-----+---------+-------+
| Host                  | char(60)                          | NO   | PRI |         |       |
| User                  | char(16)                          | NO   | PRI |         |       |
| Password              | char(41)                          | NO   |     |         |       |
| Select_priv           | enum('N','Y')                     | NO   |     | N       |       |
| Insert_priv           | enum('N','Y')                     | NO   |     | N       |       |
| Update_priv           | enum('N','Y')                     | NO   |     | N       |       |
| Delete_priv           | enum('N','Y')                     | NO   |     | N       |       |
| Create_priv           | enum('N','Y')                     | NO   |     | N       |       |
| Drop_priv             | enum('N','Y')                     | NO   |     | N       |       |
| Reload_priv           | enum('N','Y')                     | NO   |     | N       |       |
| Shutdown_priv         | enum('N','Y')                     | NO   |     | N       |       |
| Process_priv          | enum('N','Y')                     | NO   |     | N       |       |
| File_priv             | enum('N','Y')                     | NO   |     | N       |       |
| Grant_priv            | enum('N','Y')                     | NO   |     | N       |       |
| References_priv       | enum('N','Y')                     | NO   |     | N       |       |
| Index_priv            | enum('N','Y')                     | NO   |     | N       |       |
| Alter_priv            | enum('N','Y')                     | NO   |     | N       |       |
| Show_db_priv          | enum('N','Y')                     | NO   |     | N       |       |
| Super_priv            | enum('N','Y')                     | NO   |     | N       |       |
| Create_tmp_table_priv | enum('N','Y')                     | NO   |     | N       |       |
| Lock_tables_priv      | enum('N','Y')                     | NO   |     | N       |       |
| Execute_priv          | enum('N','Y')                     | NO   |     | N       |       |
| Repl_slave_priv       | enum('N','Y')                     | NO   |     | N       |       |
| Repl_client_priv      | enum('N','Y')                     | NO   |     | N       |       |
| Create_view_priv      | enum('N','Y')                     | NO   |     | N       |       |
| Show_view_priv        | enum('N','Y')                     | NO   |     | N       |       |
| Create_routine_priv   | enum('N','Y')                     | NO   |     | N       |       |
| Alter_routine_priv    | enum('N','Y')                     | NO   |     | N       |       |
| Create_user_priv      | enum('N','Y')                     | NO   |     | N       |       |
| Event_priv            | enum('N','Y')                     | NO   |     | N       |       |
| Trigger_priv          | enum('N','Y')                     | NO   |     | N       |       |
| ssl_type              | enum('','ANY','X509','SPECIFIED') | NO   |     |         |       |
| ssl_cipher            | blob                              | NO   |     | NULL    |       |
| x509_issuer           | blob                              | NO   |     | NULL    |       |
| x509_subject          | blob                              | NO   |     | NULL    |       |
| max_questions         | int(11) unsigned                  | NO   |     | 0       |       |
| max_updates           | int(11) unsigned                  | NO   |     | 0       |       |
| max_connections       | int(11) unsigned                  | NO   |     | 0       |       |
| max_user_connections  | int(11) unsigned                  | NO   |     | 0       |       |
+-----------------------+-----------------------------------+------+-----+---------+-------+
Lastly, to see the status of each table, we can use the following command:
mysql> SHOW TABLE STATUS;
This will display a listing of all tables, with information about the database engine used for each table, the row format, the number of rows, average length of the rows in the table, the creation time stamp and so on.
Granting User Access
To setup username and password combinations as access credentials to use to login to the databases we setup, we use the GRANT syntax:
mysql> GRANT ALL PRIVILEGES ON `db_name`.* TO 'some_username'@'localhost' IDENTIFIED BY 'some_password';
Here, remember to replace db_name with the database name you are providing access to. If you want to give access to all databases on this database server, you can use the following syntax:
mysql> GRANT ALL PRIVILEGES ON *.* TO 'some_admin_user'@'%' IDENTIFIED BY 'some_password' WITH GRANT OPTION;
Here, notice that "localhost" is replaced with "%", meaning that they can login from any computer, not only the same computer that MySQL is running from. Secondly, the "." refers to all databases. Lastly, notice WITH GRANT OPTION, giving the user permission to create other user accounts.
General Administrative Commands
When debugging performance issues, it is sometimes useful to list all processes and queries being executed by MySQL at the present moment. To do this, use the following command:
mysql> SHOW PROCESSLIST;
To list all databases on the server, use the command:
mysql> SHOW DATABASES;
Exercises
1) Below is an ERD for a generic sales system.
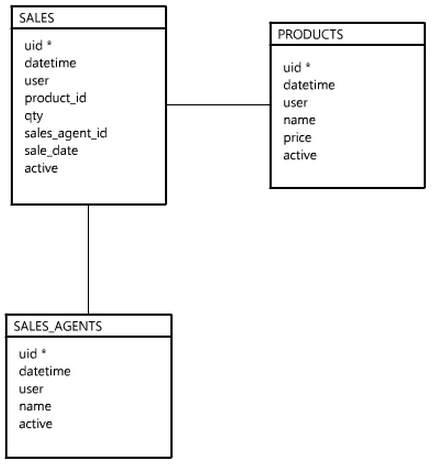
Create a database called sales, and write the CREATE TABLE commands to create the various tables defined in the diagram above.
2) Below is an ERD for a generic library system.
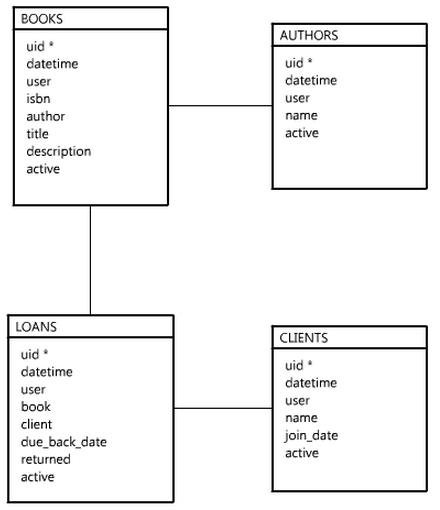
Create a database called library, and write the CREATE TABLE commands to create the various tables defined in the diagram above.