3.5 Programming with Databases
Introduction
To begin with, we need to install the Python connector for MySQL. To do this, follow the instructions on the MySQL Python Connector page.
Connecting to a MySQL Database
In order to make use of the connector, we first need to import the mysql module into our code. While we are at it, let's also import the errorcode module from the mysql connector so that we can handle errors.
import mysql.connector
from mysql.connector import errorcode
Once we have imported the required modules, we can connect using the connect() function.
cnx = mysql.connector.connect(user='username', password='password', database='my_db')
We can use the TRY CATCH syntax to handle errors, and differentiate between them using the errorcode module we imported. Let's take a look at an example:
import mysql.connector
from mysql.connector import errorcode

try:
    cnx = mysql.connector.connect(user='scott', database='test_db')
except mysql.connector.Error as err:
    if err.errno == errorcode.ER_ACCESS_DENIED_ERROR:
        print("Something is wrong with your user name or password")
    elif err.errno == errorcode.ER_BAD_DB_ERROR:
        print("Database does not exists")
    else:
        print(err)
else:
    cnx.close()
Non-select Queries
To execute queries, we need to make use of the cursor object. Once we have connected to the database, we can get the cursor using the following syntax:
cursor = cnx.cursor()
With the cursor object, we can use the execute() function to execute queries on the database server. The syntax for the execute() command is as follows:
cursor.execute(query, data)
Here is an example:
import mysql.connector
from mysql.connector import errorcode

# Query SQL
query = ("INSERT INTO employees "
    "(first_name, last_name, hire_date, gender, birth_date) "
    "VALUES (%s, %s, %s, %s, %s)")

# Data to insert into the Query
data_employee = ('Bob', 'The Builder', date(2014, 1, 1), 'M', date(1977, 6, 14))

# Insert new employee
cursor.execute(add_employee, data_employee)
employee_id = cursor.lastrowid

# Make sure data is committed to the database
cnx.commit()

# Close the Cursor and connection once done
cursor.close()
cnx.close()
Notice the following important aspects of the code above:
- employee_id = cursor.lastrowid : This line allows us to retrieve the autoincrementing unique ID for the record just inserted.
- cnx.commit() : This line makes the changes on the database server permanent.
- cursor.close() : This resets all results, and removes the cursor's link to the connection object.
- cnx.close() : The close() function here ends the connection to the MySQL server.
Note: We can use the same procedure for the following statements:
- CREATE
- INSERT
- UPDATE
- DELETE
Select Queries
To end off, let's take a look at retrieving data from the database in Python. We do this by using the cursor.execute() function as before, and then we use the cursor as a collection to iterate through with a for loop to access the results set. Let's look at an example:
import mysql.connector
from mysql.connector import errorcode

query = ("SELECT first_name, last_name, hire_date FROM employees "
     "WHERE hire_date BETWEEN %s AND %s")
data = (datetime.date(1999, 1, 1), datetime.date(2013, 12, 31))

cursor.execute(query, data)

for (first_name, last_name, hire_date) in cursor:
    print("%s, %s was hired on {:%d %b %Y}".format(last_name, first_name, hire_date))

# Close the Cursor and connection once done
cursor.close()
cnx.close()
we could alternatively iterate through the cursor result set as follows:
for record in cursor:
    print record
Here, you will better see the structure of each record returned. Each record can be used as a standard list in Python for manipulating the data.
For more information about the Python connector for MySQL, take a look at the Documentation page for the connector.
Exercises
Create the database described in the following ERD, and write a command-line Python program with the following functionality.
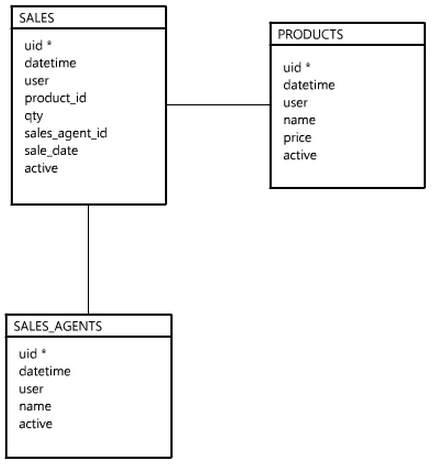
- The option to input products, sales and agents.
- The option to display a list of products, or sales, or agents.
- The option to display a sales report, showing the total number of sales, and total income per book.