3.3 SQL: INSERT, DELETE, UPDATE
Introduction
The commands we use to work with the data contained within the database is referred to as SQL, or Structured Query Language. This is a standardized set of syntax used in many popular database engines, such as Microsoft SQL Server, Oracle, PostgreSQL, and many others. In this section, we will look at some of the SQL statements for manipulating data: INSERT, DELETE and UPDATE statements.
INSERT
Once we have created a table, we have an empty structure which is ready to receive data. Once again, an empty table is no good to us. So let’s start adding data. We do this with the INSERT command. The syntax for this is as follows:
mysql> INSERT INTO `table_name`
    (`field_1`, `field_2`, `field_3`, `field_4)
  VALUES
    ("val 1", "val 2", "val 3", "val 4");
It is very important to ensure that the number and order of fields and values are in the correct order, and the number of fields matches the number of values..
A second way of inserting data into a table is using a SELECT statement, which we will cover later. For now, it should just be noted that the following is possible (and quite useful in some situations):
mysql> INSERT INTO `table_name`
   SELECT * FROM `table_name_2`;
The above query is only valid, however, if the number and order of fields returned by the select query matches the order and number of fields for the table into which you are inserting.
A third way of inserting data into a table is with the LOAD DATA INFILE command. This takes a CSV (Comma Separated Value) file, and inserts it into a table. It is important to note two things: firstly, the CSV file needs to be on the same server as the MySQL service.
A mistake often made by beginners is attempting to connect to a MySQL service from another machine, and executing the LOAD DATA INFILE command, only to find that it returns an error message even though the path to the file looks perfectly correct. This is because the file is on the machine from which you are connecting, and not on the MySQL server itself. So, the CSV file first needs to be transferred to the MySQL (preferably through secure copy - scp) and then the command should be executed.
The syntax for this method is as follows:
mysql> LOAD DATA INFILE '/path/to/file'
    INTO TABLE `table_name`;
This assumes a standard CSV file format. If, however, you are trying to use a CSV file with non-standard delimiters, you can explicity state the format as follows:
 mysql> LOAD DATA INFILE '/path/to/file'
    INTO TABLE `table_name`
   FIELDS
       TERMINATED BY ','
    LINES
       TERMINATED BY ';'
DELETE
In the situations when we need to remove a complete row of information from the table, we use the DELETE statement. The syntax is as follows:
mysql> DELETE FROM `table_name` WHERE where_condition;
In the above query, we specify firstly the name of the table from which we wish to delete the row, and secondly we specify one or more where conditions. For example:
mysql> DELETE FROM `tasks` WHERE `uid` = 1;
The above statement will delete the row from the tasks table with a uid value of 1. We will consider the WHERE clause in more detail in the following section on the SELECT statement.
UPDATE
We have taken a look at how to create databases, create tables, insert data and delete data. Now, let's look at updating data already existing in a database.
To change the value of one or more rows in a table, we use the UPDATE query. The structure is as follows:
mysql> UPDATE
   `table_name`
SET
   `field1` = ‘value1’,
   `field2` = ‘value2’,
   `field3` = ‘value3’
WHERE
  where_condition_1
  where_condition_2
For example, if we wanted to change the username of a user to ‘some_password’, we would do so with the following SQL:
mysql> UPDATE
  `users`
SET
  `password` = ‘some_password’
WHERE
  `uid` = 1
So, here, we are changing the value held in the password field to ‘some_password’ only in the case where the row’s uid field contains a value of 1. In other words, we’re changing user #1’s password to ‘some_password’.
Exercise
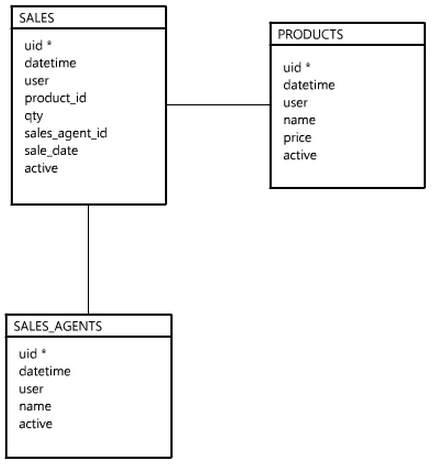
Below is the ERD from the previous section for a generic sales system. Write the INSERT statements to insert the data provided below.

Sample Data
products
1, 2012-01-01 12:30:45, 1, Chair, 10.00, 1
2, 2012-01-01 12:46:19, 1, Table, 26.40, 1
sales_agents
1, 2012-01-01 11:35:11, 1, Joe Bloggs, 1
2, 2012-01-01 11:48:12, 1, Bob the Builder, 1
sales
1, 2012-01-02 14:39:10, 1, 1, 6, 1, 2012-01-02, 1
2, 2012-01-02 14:48:00, 1, 2, 1, 1, 2012-01-02, 1
3, 2012-01-02 15:40:38, 1, 1, 10, 1, 2012-01-02, 1
4, 2012-01-02 16:01:34, 1, 1, 8, 2, 2012-01-02, 1
5, 2012-01-02 16:45:01, 1, 2, 2, 2, 2012-01-02, 1
6, 2012-01-03 09:49:10, 1, 1, 6, 2, 2012-01-03, 1
7, 2012-01-03 10:28:00, 1, 2, 1, 1, 2012-01-03, 1
8, 2012-01-03 12:30:28, 1, 1, 2, 2, 2012-01-03, 1
9, 2012-01-03 16:21:34, 1, 1, 8, 1, 2012-01-03, 1

